

This is a follow-up to my previous post about hosting a simple React App in Azure, and now we’ll cover using Azure Functions to deliver REST API. I would like to begin with the caveat that both posts are meant to be used as steps to deploy to Azure as quickly as possible. Production-level apps must address other concerns such as custom domains, scaling, infrastructure as code, authentication and authorization, and so on. Those topics are beyond the scope of either post.
Most web apps need to talk to an API back-end to deliver content. The steps involved might be using a framework to write the API. Then, a way to host the API somewhere for external access. Since a RESTful API is expected to be stateless, it is fairly easy to deliver such an API using Azure functions, Azure’s serverless offering. Here is a set of steps to quickly create a basic API hosted in Azure, that your web app can talk to.
Step 1: Install the Azure Functions Core Tools and Initialize the Project
Follow the instructions here and install the tools. Once installed, from the command line, run the following:
func init my-apiStep 2: Create the Function for a Single API Endpoint
cd my-apifunc newChoose option 8. for HTTP trigger, and enter a name for the function, for example getItemNames. This creates two files, function.json and index.js under the folder my-api/getItemNames. Open up function.js and remove “post” from the request method as follows:
{
   "bindings": [{
      "authLevel": "function",
      "type": "httpTrigger",
      "direction": "in",
      "name": "req",
      "methods": [ "get" ]
    },
    {
      "type": "http",
      "direction": "out",
      "name": "res"
    }]
}
Open index.js, and replace the code with
module.exports = async function (context, req)
{
    context.log('JavaScript HTTP trigger function processed a request.');
    const response = {
      itemNames: "item1, item2, item3"
    };
    context.res = {
        // status: 200, /* Defaults to 200 */
        body: response
    };
};
For now, we will just return a hard-coded list of strings. But one could easily add a connection to a database or Azure storage solution to retrieve the data from there instead.
Step 3: Test Function Locally
From the my-api folder run
func startThis should generate an output such as
Now listening on: https://0.0.0.0:7071Application started. Press Ctrl+C to shut down.
Http Functions:	getItemNames: [GET] https://localhost:7071/api/getItemNames
In a browser, navigate to https://localhost:7071/api/getItemNames, and you should see the output
{
  "itemNames": "item1, item2, item3"
}
which is what our function was built to return.
Step 4: Publish to Azure
For this you will have to first create a function app in Azure, either using the Azure CLI or via the portal. From the portal, you can use the Create a Resource button on the main portal page, and Function App on the following page. You will need an Azure subscription to proceed, and it is fairly easy to get a free subscription to get started. For example, these are the settings I used to create my function app
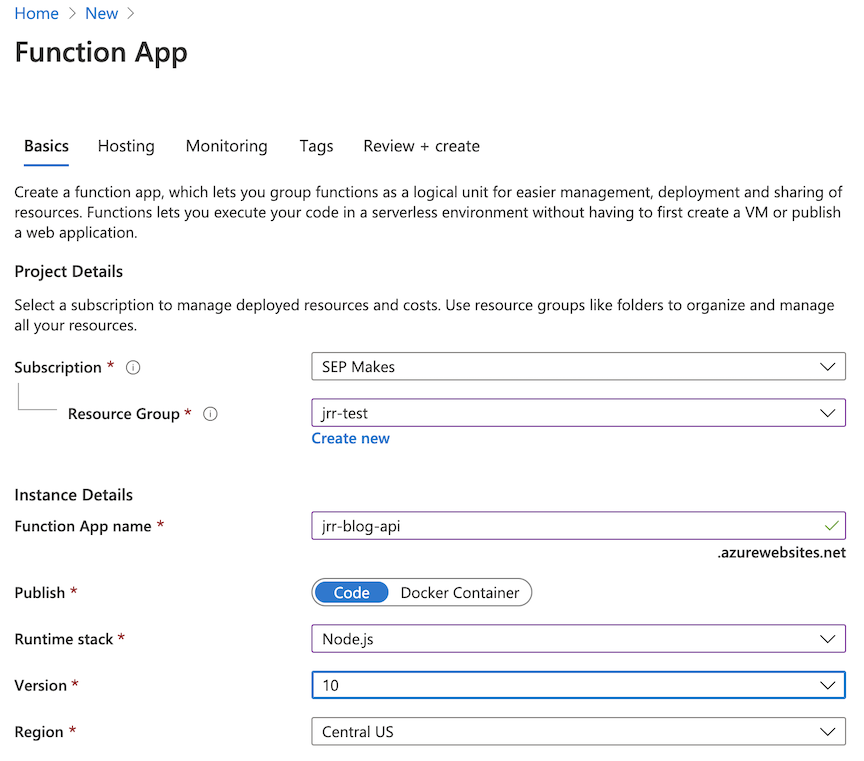
You can choose default values for other settings, and then click Review + create followed by create to create the function app and other dependent resources. I chose to disable Application Insights for my demo. Once created, I used the Azure CLI to publish my function from the command line to my newly created function app as follows:
func azure functionapp publish jrr-blog-apiThis resulted in the output
Getting site publishing info...
Creating archive for current directory...
Uploading 1.45 KB [###############################################################################]
Upload completed successfully.Deployment completed successfully.
Syncing triggers...
Functions in jrr-blog-api:
    getItemNames - [httpTrigger]
        Invoke url: https://jrr-blog-api.azurewebsites.net/api/getitemnames?code=**********************
where I have used *********** to obfuscate the function key, used to keep the function secure.
That’s it. The invoke url shown above can be used in any client app to access the API. For example, using axios in a React app. Other concerns such as developing an OpenAPI spec have been documented well, and can be easily addressed.
Of course, to move to production, you will need to codify all the Azure resources involved using either Terraform, Azure Resource Manager Templates, or Azure Blueprints. That’s a whole new ballgame, reserved for another time. This tutorial about using Azure Functions to deliver REST API and the previous one should hopefully get you started very quickly with what is available in Azure for web apps.