

Today, I will walk you through a few steps to start learning game development with Pico-8.
Video games are all around us. They connect to our TVs, occupy our computers, and ride along with us in our pockets. Our experiences with them ranging from a quick, fun diversions to immersive multi-hour sagas. Many of us have grown up around video games, and perhaps that has also been your experience. But have you ever considered making a game of your own? The idea of game development can seem daunting at first. The good news is that there are tools today, like Pico-8, that make it easier than ever to make your own game!
Pico-8 is a retro “fantasy console” that provides a great sandbox for learning game development. I will cover where to get it, how to navigate it’s interface, and how to start making a game. What is Pico-8, you ask? Check out this article on my personal blog for an intro.
Where to Download Pico-8
Pico-8 is a creation of Lexaloffle Games, and you can purchase it for $15 from their website. They distribute Pico-8 as a Zip file that you can extract to your computer’s hard drive, though there is also a Windows installer if you prefer to go that route.
Fire It Up
Launching Pico-8 will work differently depending on your operating system:
- Windows: Run the pico8 executable.
- Linux: Run it from the terminal: ./pico8
- MacOS: Drag the PICO-8.app folder to your Applications folder, and then run it like a normal app.
- Raspberry Pi: Run it from the terminal: ./pico8
Writing and Running Your First Game Code
When Pico-8 starts up, it will greet you with this screen.
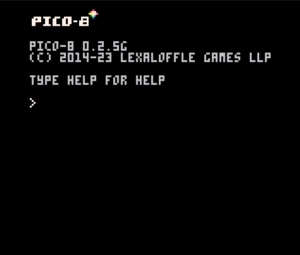
Pico-8 has three main interfaces:
- Command-line terminal: Where you input commands
- Game editor: Where you write your code, create sprites, sounds, etc.
- Game runner: Where you play your games
First off, let’s take a look at the game editor. Press Esc to open the editor. This brings us to the code editor where you will write your game’s code.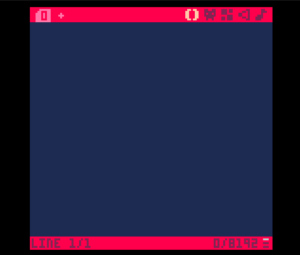
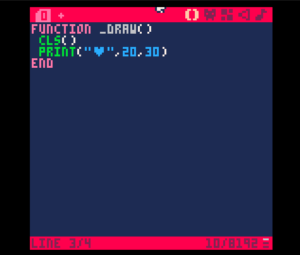
Let’s add some super simple code to print a heart to the screen at position (20,30). To include the heart symbol, simply copy the code below and paste it into your editor.
function _draw()
 cls()
 print("♥",20,30)
end
It should look like this.
Now, let’s give your code a spin. There are a couple of ways to run your game:
- Either press Ctrl+R on your keyboard
- Or press Esc and then type Run and then press Enter
Congrats! You’ve printed a heart on the screen! If you get an error message, first press Esc until the code editor comes back up, and then double-check that you aren’t missing anything from the code above. Once you are ready, try starting your game again. Errors and testing are just part of the experience of game development.
To return to the code editor, press Esc twice.
Drawing Sprites
So, we’ve printed a heart to the screen. Cool. But, what about drawing pixel graphics like a sprite? Well, take a look at the top-right corner of the screen. There is an icon for each tool/area of the game editor. Click the little monster face icon to open the sprite editor.
Here is where we will create a sprite (a 2D picture) to draw on the screen. Draw something in the large black box using the color palette and pencil tool. It could be as simple as a smiley face. You can always improve it later. Once you have drawn your sprite, take a look at the number next to the tiny version of your sprite. For me, the number is 001. Remember that number because you’ll need it later.
![]()
Now, let’s update your code to draw your new sprite. First, go back to the coding view by clicking the () icon. Then, change the line that prints the heart to instead use the SPR function to draw your new sprite:
SPR(1,20,30)
This tells Pico-8 to draw sprite #1 at position (20,30) on the screen. If your sprite had a different number, then replace 1 with your sprite’s number. Each sprite in your game will have a unique number so that you can choose when and where to draw it.
![]()
Now, run your game using Ctrl + R or the Run command, and voilà! Your sprite shows up on the screen! Isn’t that nice? You are well on your way to learning game development. If you receive an error, you can hit Esc to return to your code and fix what’s wrong. Make sure it matches my code example and that the sprite number in your code matches the number of the sprite on the sprite editor screen.
![]()
In fact, you could go back to the editor and add more lines of code to draw the sprite at additional locations on the screen like this. Try it out.
function _draw()
 cls()
 spr(1,20,30)
 spr(1,35,60)
 spr(1,55,45)
end
By the way, the cls() line of code tells Pico-8 to clear the screen, filling it with black, prior to drawing your sprites to the screen. That way old screen content doesn’t show up when drawing your sprites. This is especially important once you start moving your sprite around. All of this code lives inside of the _draw() function, which is automatically called by Pico-8 to draw content to the screen. Going forward, you should place all of your drawing code in the _draw() function.
Let’s save your game’s code by pressing the Esc key and then typing “SAVE MYGAME” and pressing Enter. This will save the game with file name “MYGAME.P8”. You can use whatever file name you wish.
Adding Controls to Your Game
Cool, so you have drawn your sprite to the screen. That’s the first important step to game development. But, it wouldn’t be a game unless you can control your character. So, let’s add some movement controls.
Let’s take a look at your drawing code. First of all, if you have spr lines in your code, remove all but one of them. We’ll only need to draw a single sprite to the screen. Right now, Pico-8 will always draw your sprite at the same location. In my case, x-position 20 and y-position 30.
spr(1,20,30)
The first parameter is the sprite number (1), the second parameter is the x-position (20), and the third parameter is the y-position (30). By the way, Pico-8’s 2D coordinates start at (0,0) in the top-left corner, with positive x going to the right and positive y going downward.
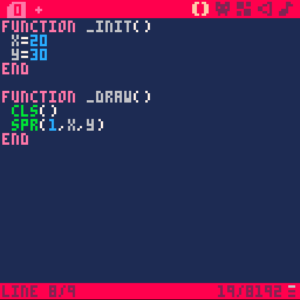
We’ll need to change the x and y positions we give to that function to move your sprite around. First, let’s create variables for x and y that will store the current x and y positions. This will allow you to change them during the game easily. We’ll create those in another special Pico-8 function called _init().
function _init()
 x=20
 y=30
end
The _init() function is automatically called by Pico-8 once at the beginning of a game. It is the place to initialize any variables that the game needs. Here we set both the x and y values. By the way, x and y aren’t special names to Pico-8. We could call them anything like xpos and ypos, or apple and orange if we wanted to. Now that we have our x and y stored into variables, let’s update our _draw() function to use them.
function _draw()
 cls()
 spr(1,x,y)
end
This will draw our sprite at whatever screen position corresponds to x and y. Try running your game to see it work. Hit Esc twice to come back to the code editor.
Now, we are ready to add code to handle keyboard control input. Here’s where I will introduce a third special Pico-8 function named _update().
function _update()
 if btn(1) then
  x=x+1
 end
end
There are few ideas to talk through. First of all, the _update() function is automatically called by Pico-8 many times per second to handle any updates that need to happen to the game’s state. It is called before _draw(). In fact, Pico-8 runs update, then draw, then update, then draw, over and over many times per second. This is called the “game loop”, and it gives us the opportunity to adjust the position of our sprite during update so that it’s ready for Pico-8 to draw it at a new location. The game loop an important concept in game development.
The if btn(1) then line of code means that if the right arrow button on the keyboard is pressed, then the code within will be executed. In our case x=x+1, which will slightly increase our sprite’s x-position during each round of updates. Our sprite will move ever so slightly to the right when it is drawn. Give that code a try. Run the code and press the right arrow key.
Does your sprite move to the right? Woohoo! Now you are in control!
But, we want to do more than just move to the right. We want to be able to move our character in all four directions. Add additional code within the _update() function to handle when the player presses up, left, and down.
function _update()
 if btn(0) then
  x=x-1
 end

 if btn(1) then
  x=x+1
 end

 if btn(2) then
  y=y-1
 end

 if btn(3) then
  y=y+1
 end
end
Do you see what’s happening here? Each keyboard key press is handled by btn:
- 0: left arrow
- 1: right arrow
- 2: up arrow
- 3: down arrow
We have to add or remove a little bit from x and y to move the sprite slightly left, right, up, or down, depending on which key is pressed. In the update function we handle keyboard input and adjust our x and y values, and then in the draw function we use those new x and y values to draw the sprite in a new location. Voilà! Movement!

Important: Make sure to save your game using Ctrl + S or pressing Esc and then typing “SAVE” and pressing Enter. Nothing is sadder than writing some delightful game code and forgetting to save your progress.
We’ve done a lot today, so let’s leave it there. I encourage you to play around with your game and try things out. What if you hold two arrow buttons at once? What if you change the update function to add a larger number to x or y when a button is pressed? There’s a lot more to learn and explore in game development, and hopefully this gives you a good taste of what is possible.
Further Exploration in Game Development
If you’d like to explore what else you can add to your game, take a look at my Pico-8 creations for some ideas. They aren’t full-fledged “games”, but are small focused demonstrations of gameplay mechanics like movement, jumping, collisions, and gravity. You can download the *.p8 files, place them in Pico-8’s carts folder, and open them using the LOAD command.
To load carts into Pico-8:
- Press Esc to switch to Pico-8’s command-line terminal.
- Type the command FOLDER and then press Enter.
- This will open the carts folder in your operating system.
- Download some of my carts (*.p8 files) and place them in Pico-8’s carts folder.
- Go back to Pico-8 and type LOAD <filename> to open one of the carts/games. For example, LOAD BOUNCE.P8
- You can run the game using Ctrl + R, or using the LOAD and RUN commands, just like any other cart.
Happy gaming!