The containerization trend has been growing for a while now in the industry. The idea is to “containerize” (or package) any application into a well-defined container. This allows the same packaged application to be deployed to run on any infrastructure.
In other words, placing your application in a container allows you to run the exact same “image” wherever you want. That could be:
- Amazon AWS
- Azure
- Heroku
- On-premise self-hosting
- Local development environments
In the .NET ecosystem, ASP.NET Core applications are well-suited to take advantage of this movement. This post explores how to get started running ASP.NET Core applications in Docker containers.
Environment setup for Docker
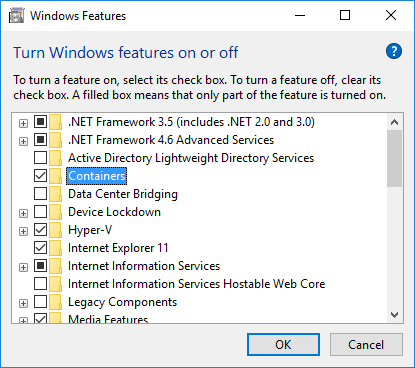
- Ensure that Hyper-V is enabled on your computer
- Install Docker for Windows
- Enable the Containers Windows feature

Environment setup for .NET core
Do at least one these steps:
- Install Visual Studio 2015 (and apply Visual Studio 2015 Update 3)
- Install the .NET Core 1.1 SDK
Creating the application
Now let’s create a basic ASP.NET Core application. We’ll use this application as the deploy target for Docker below.
mkdir app
cd app
dotnet new -t web
Building the application
To build the application, we’ll need to restore the packages referenced in the project.json file.
dotnet restoreAfter the packages are restored, we can build the application.
dotnet buildRunning the application
To run the application:
dotnet runThis should show output similar to the following:
Project app (.NETCoreApp,Version=v1.0) was previously compiled. Skipping compilation.
 info:Microsoft.Extensions.DependencyInjection.DataProtectionServices[0]
 Hosting environment: Production
 Content root path: c:\PROJECTS\docker-aspnet-core-examples\app
 Now listening on: https://localhost:5000Application started.
 Press Ctrl+C to shut down.
As indicated, the application will be available at https://localhost:5000.
Creating the Dockerfile
Now that we have an application, let’s move it into a Docker container.
To do this, create a file named Dockerfile. Include Dockerfile in the publishOptions of the project.json file.
 ...
 "publishOptions": {
   "include": [
     "wwwroot",
     "**/*.cshtml",
     "appsettings.json",
     "web.config",
     "Dockerfile"
   ]
 },
 ...
Publishing the application
Before moving on to hosting the application in Docker, we first need to publish the application.
dotnet publishThis publishes the application and all of its dependencies into a single directory for deployment.
Hosting in Docker
Kestrel is a cross-platform HTTP server. We’ll use that to host the ASP.NET Core application in each of the Docker configurations below.
Hosting in Linux
The first Docker configuration we’ll examine is hosting the application in Linux. We’ll use the ASP.NET Core Docker Image as the base image for the Docker container.
Place the following contents into Dockerfile:
FROM microsoft/aspnetcore:1.0
ENTRYPOINT ["dotnet", "app.dll"]
ARG source=.
WORKDIR /app
EXPOSE 80
COPY $source .
Then we need to re-publish the application (to place the Dockerfile alongside the published application).
dotnet publishNext, build a Docker image containing the application.
docker build bin\Debug\netcoreapp1.0\publish -t apponlinuxIf this is the first time you’ve made a container based on microsoft/aspnetcore:1.0, that base container will be downloaded. After that, a specific image will be created.
You can see the container by running the docker images command:
REPOSITORY TAG IMAGE ID CREATED SIZE
apponlinux latest 9d9bf2fce243 4 seconds ago 289 MB
Now that we have an image, let’s start the container.
docker run -it --name linuxcontainer -d -p 85:80 apponlinuxThat command starts an instance (named linuxcontainer) of the apponlinux image we created earlier. It also proxies port 80 on the instance to port 85 locally.
You can see a list of running containers using the docker ps command.
CONTAINER ID IMAGE COMMAND CREATED STATUS PORTS NAMES
4e68b9721bd1 apponlinux "dotnet app.dll" 6 seconds ago Up 5 seconds 0.0.0.0:85->80/tcp linuxcontainer
The application will be available at https://localhost:85/.
When you’re done with the container, you can stop it using the docker stop command.
docker stop linuxcontainerHosting in Windows
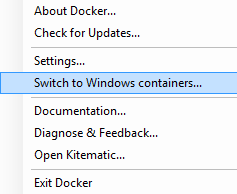
When running on a Windows host, Docker can also host Windows containers. To do this, first switch your Docker instance to run Windows containers.

For Windows hosting, Windows Nano Server is a good target. Windows Nano Server is a stripped down version of Windows Server. It has a much smaller footprint (than Windows Server Core) and is designed for cloud and DevOps scenarios.
In order to switch from Linux to Windows Nano Server, only two changes need to be made to the Dockerfile:
- The FROM line changed to point to a different base image
- Adding the ASPNETCORE_URLS environment variable
When complete, the Dockerfile will have the following content:
FROM microsoft/dotnet:nanoserver
ENTRYPOINT ["dotnet", "app.dll"]
ARG source=.WORKDIR /app
ENV ASPNETCORE_URLS https://+:80
EXPOSE 80
COPY $source .
Other than those changes, the steps are the same (with some names changed to keep the images and containers unique).
dotnet publish
docker build bin\Debug\netcoreapp1.0\publish -t apponnanodocker run -it --name nanocontainer -d -p 85:80 apponnano
Ideally, at this point you’d be able to access the application at https://localhost:85. Unfortunately, at the moment there is a bug with Windows 10 that prevents that. So, you’ll need to lookup the IP address of the container and access it that way.
To do this, use the docker inspect command to find the IP address.
docker inspect -f "{{ .NetworkSettings.Networks.nat.IPAddress }}" nanocontainerThen you’ll be able to access the application at that IP address (on port 80).
What’s next?
It’s not recommended to run Kestrel as your frontline web server. So, the next step would be to place a reverse proxy in front of your application.
But that’s the topic for another day…